
Avocado & Egg Toast Deluxe – Sarah’s Gourmet Breakfast Made Simple
July 21, 2026
Tomato Basil Bruschetta – Sarah’s Fresh, Vibrant Taste of Italy
July 21, 2026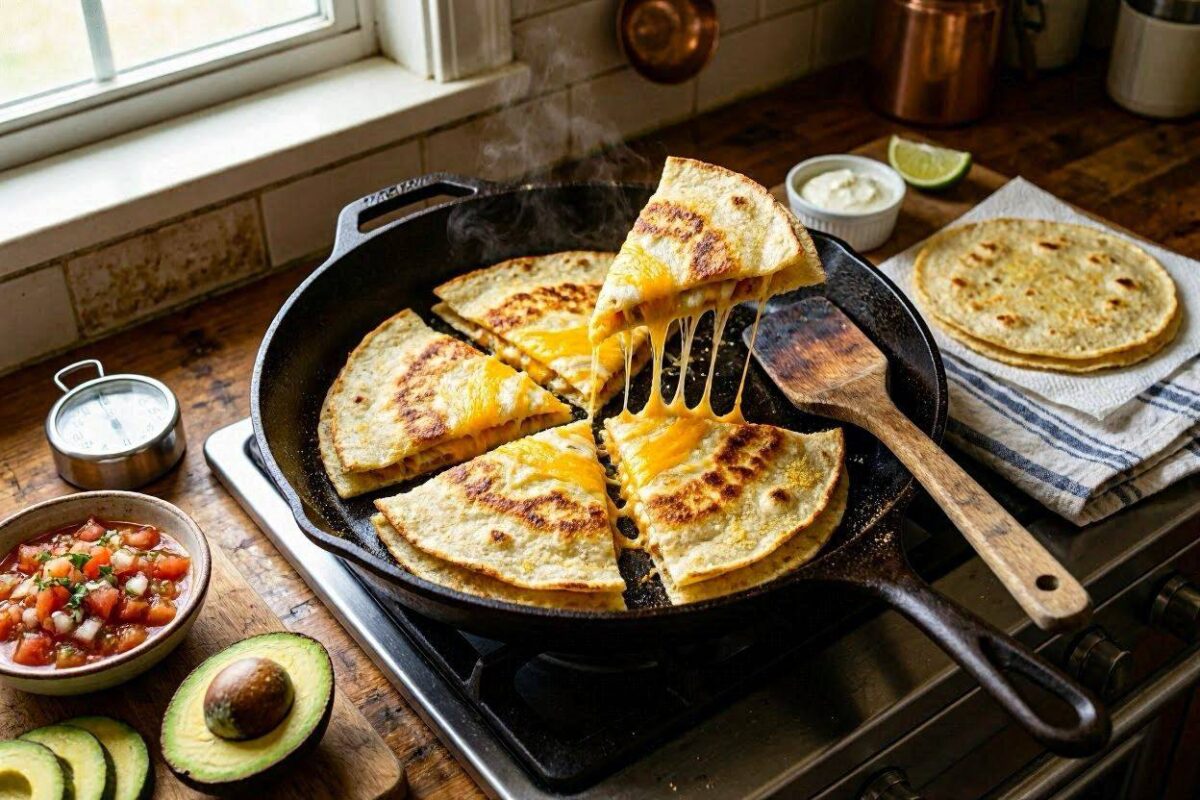
Introduction – A Word from Sarah
I’m Sarah, and if there’s one dish that has rescued me from countless “what’s for dinner?” emergencies, it’s these 15-Minute Cheesy Skillet Quesadillas.
I still remember the first time I made them. It was one of those chaotic evenings — everyone was hungry, I had no energy, and the fridge was looking sad and empty. I had some tortillas, a block of cheese, and a few leftover vegetables. That was it.
I thought, “Well, I’ll just throw something together.” I grated the cheese, chopped some peppers, filled the tortillas, and threw them in a hot skillet. In just minutes, the kitchen filled with the most amazing aroma of toasted tortillas and melted cheese. My kids came running, and they devoured them in seconds.
Today, I’m sharing with you Sarah’s 15-Minute Cheesy Skillet Quesadillas — the dish that makes me feel like a hero on even my busiest, most exhausting days.
Why These Quesadillas Are Special in Sarah’s Kitchen
These quesadillas aren’t just quick — they’re crowd-pleasing perfection. They’re the dish I turn to when I want something satisfying, fun, and incredibly easy.
What makes them unique in my kitchen:
-
The speed: Ready in just 15 minutes — faster than takeout!
-
The simplicity: Just tortillas, cheese, and whatever fillings you have on hand.
-
The versatility: Endless filling combinations to please everyone.
-
The fun: Interactive, customizable, and always a hit with kids and adults.
-
The comfort: Crispy, melty, and absolutely irresistible.
Ingredients – From Sarah’s Kitchen
For the Quesadillas:
-
4 large flour tortillas (or corn tortillas for a gluten-free option).
-
2 cups shredded cheese (cheddar, Monterey Jack, mozzarella, or a Mexican blend).
-
1 cup cooked filling (chicken, beef, shrimp, beans, or vegetables — see variations below).
For Cooking:
-
2 tablespoons butter or olive oil (for the skillet).
For Serving (Sarah’s Favorite Toppings):
-
Sour cream or Greek yogurt.
-
Salsa or pico de gallo.
-
Guacamole or sliced avocado.
-
Fresh lime wedges.
-
Chopped cilantro.
-
Pickled jalapeños (for those who like heat).
Step-by-Step Method – Sarah’s Golden Steps
Step 1: Prepare the Filling
I’m Sarah, and I’ve learned that the key to a great quesadilla is having everything ready to go before you start cooking.
Choose your filling(s) and prepare them:
-
If using chicken, shred or dice it.
-
If using vegetables, sauté them until tender.
-
If using beans, rinse and drain them.
Sarah’s Tip: Leftovers are perfect for quesadillas! Leftover grilled chicken, roasted veggies, or taco meat all work beautifully.
Step 2: Assemble the Quesadillas
I’m Sarah, and this is the fun, easy part!
Lay a tortilla flat on a clean surface. Sprinkle half of the tortilla with a generous amount of shredded cheese. Add your filling(s) on top of the cheese. Sprinkle with more cheese on top of the filling. Fold the empty half of the tortilla over the filling, pressing down gently.
Sarah’s Tip: The cheese acts as the “glue” that holds everything together — make sure you have enough of it!
Step 3: Cook the Quesadillas
I’m Sarah, and this is where the magic happens!
Heat a large skillet over medium heat. Add ½ tablespoon of butter or olive oil and swirl to coat the pan.
Carefully place the assembled quesadilla in the skillet. Cook for 2-3 minutes until the bottom is golden and crispy.
Sarah’s Warning: Don’t rush this step! The tortilla needs time to get golden and crispy. If the heat is too high, it will burn on the outside and the cheese won’t melt properly.
Carefully flip the quesadilla using a spatula and cook for another 2-3 minutes until the other side is golden brown and the cheese is fully melted.
Sarah’s Tip: If you’re making multiple quesadillas, keep the cooked ones warm in a low oven (150°C / 300°F) while you cook the rest.
Step 4: Slice and Serve
I’m Sarah, and this is the moment everyone has been waiting for!
Transfer the quesadilla to a cutting board. Let it rest for 1-2 minutes to allow the cheese to set slightly. Slice it into wedges using a sharp knife or a pizza cutter.
Sarah’s Tip: A pizza cutter is the quickest and easiest way to slice quesadillas!
Step 5: Add the Toppings
I’m Sarah, and this is where you can really make it your own!
Serve the quesadillas with your favorite toppings — sour cream, salsa, guacamole, lime wedges, and fresh cilantro.
Sarah’s Tip: Let everyone customize their own quesadilla with their favorite toppings — it’s more fun that way!
How to Serve Quesadillas – Sarah’s Style
I’m Sarah, and I love serving quesadillas for:
-
Quick weeknight dinners: Ready in minutes with minimal cleanup.
-
Game-day snacks: Perfect for sharing with friends.
-
Lunchbox treats: Kids love them cold or warm.
-
Party appetizers: Slice them into small wedges for a crowd.
My Favorite Toppings Bar:
-
Sour cream or Greek yogurt.
-
Salsa, pico de gallo, or hot sauce.
-
Guacamole or sliced avocado.
-
Fresh lime wedges.
-
Chopped cilantro or green onions.
-
Pickled jalapeños or red pepper flakes.
Sarah’s Tip: A squeeze of fresh lime juice over the quesadillas just before serving brightens all the flavors beautifully!
Variations – Sarah’s Creative Twists
| Variation | How to Make It |
|---|---|
| Chicken Quesadillas | Add 1 cup of cooked, shredded or diced chicken. |
| Beef Quesadillas | Add 1 cup of cooked ground beef or steak strips. |
| Shrimp Quesadillas | Add 1 cup of cooked shrimp (chopped). |
| Vegetarian Quesadillas | Add sautéed bell peppers, onions, mushrooms, and corn. |
| Bean Quesadillas | Add 1 cup of black beans or refried beans. |
| Breakfast Quesadillas | Add scrambled eggs and breakfast sausage or bacon. |
| BBQ Chicken Quesadillas | Use BBQ sauce instead of salsa, and add shredded chicken. |
| Buffalo Chicken Quesadillas | Toss chicken in buffalo sauce and add blue cheese crumbles. |
| Vegan Quesadillas | Use vegan cheese and plant-based fillings. |
Secrets to Success – From Sarah’s Experience
| Question | Sarah’s Answer |
|---|---|
| Why are my quesadillas soggy? | You used too much filling, or your fillings were too wet. Pat ingredients dry before adding them. |
| Why is my cheese not melting? | The heat might be too high, or you didn’t use enough cheese. Use medium heat and be generous with the cheese. |
| Can I use corn tortillas? | Yes, but they’re smaller and more delicate. Use two tortillas and sandwich the filling between them. |
| Can I bake quesadillas? | Yes! Bake at 200°C (400°F) for 10-12 minutes, flipping halfway. |
| How do I store leftovers? | Store in the fridge for up to 3 days. Reheat in a skillet, toaster oven, or microwave. |
| Can I freeze quesadillas? | Yes! Freeze the cooked quesadillas in a single layer, then transfer to a freezer bag. Reheat from frozen in a skillet or oven. |
Sarah’s Filling Combinations
| Combination | Fillings | Best With |
|---|---|---|
| Classic | Shredded chicken, cheddar cheese, sautéed peppers and onions | Sour cream and salsa |
| Tex-Mex | Ground beef, Monterey Jack cheese, corn, black beans | Guacamole and hot sauce |
| Mediterranean | Grilled chicken, feta cheese, spinach, sun-dried tomatoes | Tzatziki |
| Breakfast | Scrambled eggs, cheddar cheese, bacon or sausage | Salsa and sour cream |
| Veggie Deluxe | Sautéed mushrooms, bell peppers, onions, zucchini, cheddar cheese | Lime crema |
| Spicy | Chicken, pepper jack cheese, jalapeños, onion | Extra hot sauce |
Nutritional Value (Per Quesadilla – Approximate)
| Nutrient | Amount |
|---|---|
| Calories | 420 kcal |
| Protein | 22 g |
| Carbohydrates | 35 g |
| Fat | 22 g |
| Fiber | 3 g |
| Calcium | 350 mg |
| Iron | 2 mg |
Sarah’s Final Tips for the Perfect Quesadillas
-
Use good melting cheese: Cheddar, Monterey Jack, and mozzarella work best.
-
Don’t overfill: Too much filling makes it hard to flip and the cheese won’t melt properly.
-
Medium heat is key: Low heat makes them soggy; high heat burns them.
-
Be generous with the cheese: It’s the “glue” that holds everything together.
-
Let them rest: A minute or two helps the cheese set and makes slicing easier.
-
Get creative: Use whatever leftovers you have on hand!
Conclusion – A Message from Sarah to You
I’m Sarah, and these 15-Minute Cheesy Skillet Quesadillas are proof that you don’t need a lot of time to create something absolutely delicious.
They remind me that cooking doesn’t have to be complicated — sometimes the simplest meals are the most loved. It’s the dish that makes everyone smile, and it’s the meal that brings my family together around the table, even on the busiest nights.
Every time I make these quesadillas, I’m reminded that food is about joy, about sharing, and about creating moments that taste as good as they feel.
I hope you try this recipe and make it your own. I hope it becomes your go-to for quick dinners, fun snacks, and everything in between.
If you try it, please share your experience with me! Did you add your own twist? Did your family love them? I’d love to hear all about it.
With love, cheese, and a little bit of sizzle, Sarah. 🤍🧀🌮