
Oven-Roasted Chicken with Potatoes and Herbs – Sarah’s Golden, Crispy, One-Pan Wonder
July 22, 2026
Creamy Yellow Lentil Soup with Crispy Bread – Sarah’s Comforting, Nutritious, Hearty Bowl of Goodness
July 22, 2026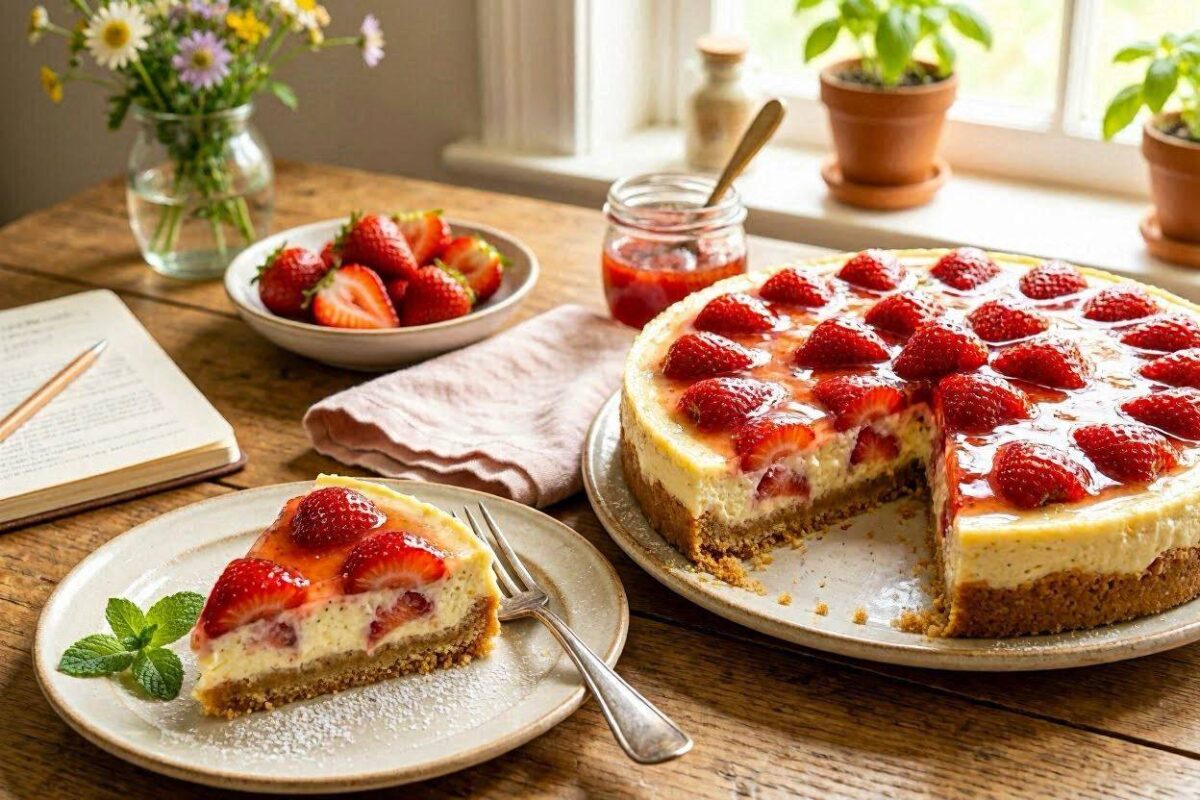
Introduction – A Word from Sarah
I’m Sarah, and if there’s one dessert that makes me feel like I’m celebrating summer in the most beautiful way, it’s this No-Bake Strawberry Cheesecake.
I still remember the first time I made it. It was a warm, sunny afternoon, and I was craving something light, refreshing, and absolutely delicious — something that would capture the essence of fresh, ripe strawberries. I had cream cheese, whipped cream, fresh strawberries, and a few simple ingredients. That was it.
I made a buttery biscuit crust, whipped up a creamy, silky filling, and topped it with a gorgeous layer of strawberry jelly and fresh berries. When I pulled it out of the fridge, it was perfectly set, beautifully pink, and absolutely stunning.
One bite, and I was in heaven. The cheesecake was creamy, tangy, and so refreshing. My family devoured it in minutes, and I knew I had found my perfect summer dessert.
Today, I’m sharing with you Sarah’s No-Bake Strawberry Cheesecake — the dessert that makes every summer day feel like a celebration.
Why This Cheesecake Is Special in Sarah’s Kitchen
This no-bake strawberry cheesecake isn’t just a dessert — it’s a creamy, dreamy, effortless summer delight. It’s the dish I turn to when I want something impressive, refreshing, and absolutely delicious.
What makes it unique in my kitchen:
-
No oven required: Perfect for hot summer days.
-
The creamy filling: Silky, tangy, and absolutely luxurious.
-
The fresh strawberries: Vibrant, sweet, and bursting with flavour.
-
The stunning presentation: A beautiful layer of strawberry jelly on top.
-
The simplicity: Just a few ingredients, no baking, and minimal effort.
Ingredients – From Sarah’s Kitchen
For the Crust:
-
200 g (7 oz) digestive biscuits or graham crackers.
-
½ cup (115 g) unsalted butter (melted).
-
2 tablespoons granulated sugar.
For the Cheesecake Filling:
-
500 g (17.6 oz) cream cheese (full-fat, room temperature).
-
1 cup (240 ml) heavy cream (cold).
-
½ cup (100 g) powdered sugar.
-
1 teaspoon vanilla extract.
-
1 tablespoon lemon juice.
For the Strawberry Topping:
-
250 g (8 oz) fresh strawberries (hulled and halved).
-
2 tablespoons granulated sugar.
-
1 tablespoon lemon juice.
-
1 tablespoon cornstarch (dissolved in 2 tablespoons cold water).
-
½ cup water.
For Garnish:
-
Fresh strawberries (sliced).
-
Fresh mint leaves.
Step-by-Step Method – Sarah’s Golden Steps
Step 1: Prepare the Crust
I’m Sarah, and I’ve learned that a good crust is the foundation of a great cheesecake.
Place the digestive biscuits in a food processor and blitz until they form fine crumbs. Alternatively, place them in a zip-lock bag and crush them with a rolling pin.
Sarah’s Tip: Don’t over-process! You want fine crumbs, not powder. A little texture is nice!
Transfer the crumbs to a bowl and add the melted butter and sugar. Mix until the mixture resembles wet sand and holds together when pressed.
Press the mixture firmly into the bottom of a 9-inch (23 cm) springform pan. Use the back of a spoon or the bottom of a glass to press it down evenly.
Sarah’s Warning: Press it firmly! If the crust is too loose, it will crumble when you slice the cheesecake.
Chill the crust in the refrigerator for at least 30 minutes to set.
Step 2: Prepare the Strawberry Topping
I’m Sarah, and this is where the beautiful, vibrant topping comes together!
In a small saucepan, combine the strawberries, sugar, lemon juice, and water. Bring to a simmer over medium heat and cook for 5-7 minutes, until the strawberries are soft and the liquid is bubbling.
Sarah’s Tip: Use fresh, ripe strawberries for the best flavour. If you only have frozen berries, they work too — just thaw them first!
Stir in the cornstarch mixture and cook for another 1-2 minutes until the mixture thickens to a syrupy consistency.
Remove from heat and let it cool completely.
Step 3: Prepare the Cheesecake Filling
I’m Sarah, and this is the creamy, dreamy part!
In a large bowl, beat the cream cheese with an electric mixer until smooth and creamy.
Sarah’s Tip: Make sure the cream cheese is at room temperature — it mixes much more smoothly and prevents lumps!
Add the powdered sugar, vanilla extract, and lemon juice, and beat until well combined.
Sarah’s Warning: Don’t overbeat! Overbeating can incorporate too much air and cause cracks in the cheesecake.
Step 4: Whip the Cream
I’m Sarah, and this is the secret to a perfectly set no-bake cheesecake!
In a separate bowl, whip the cold heavy cream until stiff peaks form. The cream should hold its shape when you lift the whisk.
Sarah’s Tip: Chill the bowl and beaters in the freezer for 5-10 minutes before whipping — it helps the cream whip faster and hold its shape better.
Step 5: Combine the Filling
I’m Sarah, and this is where the magic happens!
Gently fold the whipped cream into the cream cheese mixture in two additions. Use a spatula and fold gently until just combined.
Sarah’s Warning: Fold gently! Overmixing will deflate the whipped cream and make the filling heavy.
Step 6: Assemble the Cheesecake
I’m Sarah, and this is the moment it all comes together!
Pour the filling over the chilled crust and smooth the top with a spatula.
Carefully spoon the cooled strawberry topping over the filling, spreading it evenly.
Sarah’s Tip: For a beautiful marbled effect, spoon the topping in dollops and swirl it gently with a knife.
Step 7: Chill and Set
I’m Sarah, and this is the hardest part — waiting!
Refrigerate the cheesecake for at least 4 hours (or overnight) until fully set.
Sarah’s Warning: Don’t rush this step! The cheesecake needs time to set properly.
Step 8: Garnish and Serve
I’m Sarah, and this is the moment everyone has been waiting for!
Remove the cheesecake from the springform pan and place it on a serving plate. Garnish with fresh strawberry slices and mint leaves.
Slice and serve chilled.
How to Serve No-Bake Strawberry Cheesecake – Sarah’s Style
I’m Sarah, and I love serving this cheesecake for:
-
Summer parties: Light, refreshing, and impressive.
-
Birthdays: A beautiful celebration cake.
-
Easter and spring gatherings: Perfect for the season.
-
Any day: When you want a delicious, effortless dessert.
Sarah’s Tip: Serve chilled with a cup of tea or coffee — the tangy, creamy cheesecake pairs beautifully!
Variations – Sarah’s Creative Twists
| Variation | How to Make It |
|---|---|
| Raspberry Cheesecake | Use raspberries instead of strawberries. |
| Berry Mix Cheesecake | Use a mix of strawberries, raspberries, and blueberries. |
| Chocolate Strawberry Cheesecake | Add 2 tablespoons of cocoa powder to the filling. |
| Lemon Cheesecake | Omit the strawberry topping and add extra lemon zest and juice to the filling. |
| Vegan Cheesecake | Use vegan cream cheese and coconut cream instead of heavy cream. |
Secrets to Success – From Sarah’s Experience
| Question | Sarah’s Answer |
|---|---|
| Why is my cheesecake not setting? | The whipped cream wasn’t stiff enough, or you didn’t chill it long enough. Make sure the cream is whipped to stiff peaks and chill for at least 4 hours. |
| Why is my cheesecake grainy? | The cream cheese wasn’t at room temperature. Let it soften before mixing. |
| Why is my strawberry topping runny? | You didn’t cook it long enough, or you didn’t use enough cornstarch. Cook until it thickens. |
| Can I use a different crust? | Yes! Graham crackers, Oreos, or shortbread biscuits work beautifully. |
| How do I remove the cheesecake from the pan? | Use a springform pan. Run a knife around the edge before releasing. |
| How do I store leftovers? | Store in the fridge for up to 5 days. |
Sarah’s No-Bake Cheesecake Tips
-
Use full-fat cream cheese: Low-fat versions won’t set as well.
-
Whip cream to stiff peaks: This is the key to a set cheesecake.
-
Chill completely: At least 4 hours — overnight is better.
-
Don’t overmix: Fold gently to keep the filling light and airy.
-
Use a springform pan: Makes removal much easier.
Nutritional Value (Per Serving – Approximate)
| Nutrient | Amount |
|---|---|
| Calories | 420 kcal |
| Protein | 6 g |
| Carbohydrates | 35 g |
| Fat | 28 g |
| Fiber | 2 g |
| Calcium | 80 mg |
| Vitamin C | 25 mg |
Sarah’s Final Tips for the Perfect No-Bake Strawberry Cheesecake
-
Use room temperature cream cheese: It mixes smoothly and prevents lumps.
-
Whip the cream properly: Stiff peaks are essential for a set cheesecake.
-
Press the crust firmly: Prevents crumbling when slicing.
-
Chill for at least 4 hours: Don’t rush the setting time.
-
Use fresh, ripe strawberries: They have the best flavour.
-
Garnish beautifully: Fresh berries and mint make it look stunning.
Conclusion – A Message from Sarah to You
I’m Sarah, and this No-Bake Strawberry Cheesecake is the dessert that taught me that you don’t need an oven to create something truly spectacular.
It reminds me of warm summer days, the sweet taste of fresh strawberries, and the joy of sharing something beautiful with the people we love.
Every time I make this cheesecake, I’m reminded that the best desserts are often the simplest — the ones that come together with love and a little bit of patience.
I hope you try this recipe and make it your own. I hope it becomes your go-to for summer celebrations, family gatherings, and everything in between.
If you try it, please share your experience with me! Did the strawberry topping set perfectly? Did your family love it? I’d love to hear all about it.
With love, fresh strawberries, and a little bit of no-bake magic, Sarah. 🤍🍓🍰